

Quick answer: AutoFit automatically adjusts the width of a column or the height of a row to fit the content inside it.
Have you ever entered something in Excel and found that the text doesn’t fit inside the cell?
Maybe you typed a long name, heading, or sentence, but only part of it is visible.

So what do you usually do?
You drag the column border and make it wider.
It works, but when you have many columns, doing this one by one can take time.
This is where AutoFit can help.
AutoFit automatically adjusts the width of a column or the height of a row based on the content inside it.
This can save you time and make your worksheet look much cleaner.
In this guide, you’ll learn what AutoFit is, how to use it, and a few simple ways to adjust columns and rows in Excel.
What Is AutoFit in Excel?
AutoFit is an Excel feature that automatically adjusts the size of a column or row to fit its content.
For example, suppose you enter this heading in cell A1:
`Monthly Sales Report`
If column A is too narrow, you may not be able to see the complete text.
Instead of manually changing the column width, you can use AutoFit.
Excel will automatically adjust the column so the content fits properly.
You can use AutoFit for both:
- Column Width
- Row Height
Why Do We Need AutoFit?
When you’re working in Excel, the content in your cells may not always fit properly.
For example:
- A column may be too narrow for a long name.
- A heading may be cut off.
- A row may not be tall enough to display wrapped text.
- Numbers may not be fully visible.
You can adjust everything manually, but AutoFit makes the process much easier.
Instead of deciding how wide the column should be, you can simply ask Excel to adjust it for you.
How to AutoFit a Column in Excel?
Let’s say you have a list of employee names, but some names are longer than the column width.
Here’s the easiest way to fix it.
Step 1: Select the Column
Click the column heading of the column you want to adjust.
For example, click A to select Column A.
Step 2: Move Your Mouse to the Column Border
Move your mouse to the line between Column A and Column B.
Your mouse pointer will change.

Step 3: Double-Click the Border
Now, simply double-click the border.
Excel automatically adjusts the column width based on the content.

That’s it.
You don’t have to drag the column manually.
How to AutoFit Multiple Columns?
What if you have several columns that need adjusting?
You don’t have to do them one by one.
You can AutoFit multiple columns at the same time.
Step 1: Select the Columns
Select the columns you want to adjust.
For example, select Columns A to D.
Step 2: Double-Click the Column Border
Move your mouse to the border between any two selected columns.
Double-click the border.
Excel automatically adjusts the selected columns based on their contents.
This can be very useful when you’re working with a large table.
How to AutoFit a Row in Excel?
AutoFit also works with rows.
Suppose you have a long piece of text in a cell and you’re using Wrap Text.
The text may appear on several lines, but the row isn’t tall enough to show everything.
You can use AutoFit Row Height.
Step 1: Select the Row
Click the row number to select the row.
Step 2: Move Your Mouse to the Row Border
Move your mouse to the line between two row numbers.
For example, if you’re adjusting Row 2, move your mouse to the line between Row 2 and Row 3.

Step 3: Double-Click the Border
Double-click the border.
Excel automatically adjusts the row height to fit the content.
AutoFit Using the Ribbon:
If you don’t want to use the mouse, you can also use the Ribbon.
AutoFit Column Width:
- Select the column or columns.
- Go to the Home tab.
- Click Format in the Cells group.
- Select AutoFit Column Width.
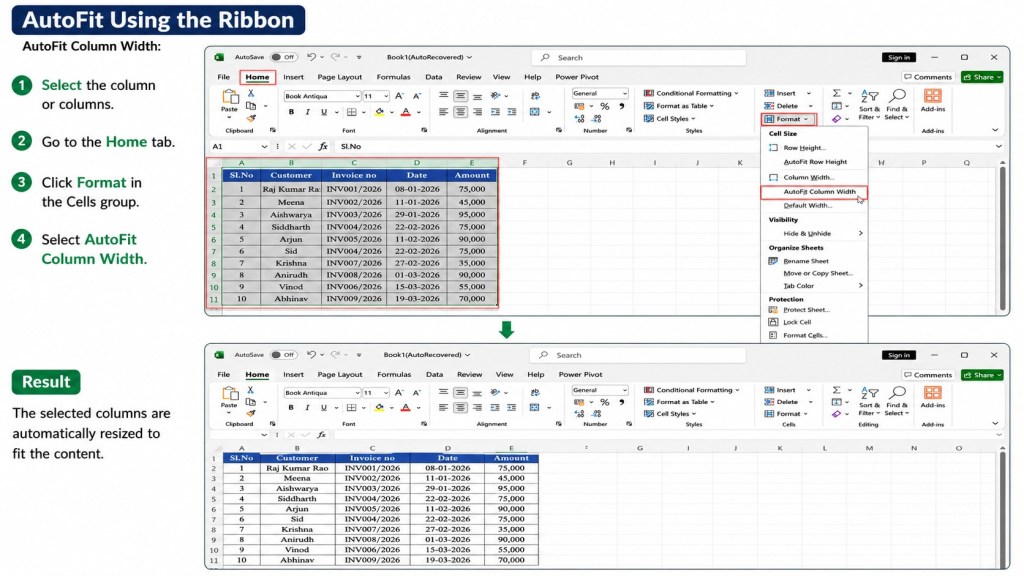
Excel will automatically adjust the selected columns.
AutoFit Row Height:
The steps are almost the same.
- Select the row or rows.
- Go to the Home tab.
- Click Format.
- Select AutoFit Row Height.

Excel will adjust the row height based on the content.
AutoFit Using Keyboard Shortcuts:
If you prefer using the keyboard, you can use Excel’s Ribbon Key Tips.
To AutoFit Column Width:
Alt → H → O → I
To AutoFit Row Height:
Alt → H → O → A
These shortcuts can be useful if you prefer working with the keyboard instead of the mouse.
AutoFit vs Manual Column or Row Width:
There are two simple ways to adjust the size of a column or row.
You can drag the column or row border manually, or you can use AutoFit.

Manual Adjustment:
You decide exactly how wide the column should be.
AutoFit:
Excel decides the required width based on the content.
For example, if you have a short list of names, AutoFit can quickly make the column wide enough to display them.
If you want all your columns to have exactly the same width, manual adjustment may be better.
AutoFit vs Wrap Text:
AutoFit and Wrap Text are sometimes confused because both can help when content doesn’t fit inside a cell.
But they work differently.
- AutoFit changes the size of the column or row.
- Wrap Text keeps the column width and moves the text to multiple lines inside the same cell.
For example, suppose you have a long sentence.
- With AutoFit, Excel may make the column wider.
- With Wrap Text, the column can stay the same width while the sentence appears on several lines.
So, which one should you use?
- If you have enough space and want the content to fit on one line, AutoFit can be useful.
- If you want to keep the column narrow, Wrap Text may be a better choice.
What Happens When You AutoFit a Column?
Excel looks at the content in the selected column and adjusts the width accordingly.
For example, suppose you have:
| Name |
| Aarav |
| Raj |
| Sandeep Reddy |
Here Sandeep Reddy is the longest name, Excel adjusts the column width so that the longest entry fits.
You don’t have to guess how wide the column should be.
Excel does it automatically.
Can You AutoFit the Entire Worksheet?
Yes.
If you want to adjust many columns at once, you can select the entire worksheet.
Click the small triangle at the top-left corner of the worksheet, where the row numbers and column letters meet.
This selects the entire worksheet.
Then use:
Home → Format → AutoFit Column Width
Excel adjusts the column widths based on the content.
You can also use AutoFit Row Height if you want to adjust the rows.
Be careful when using this on a large worksheet, though. A single cell with very long content can make a column much wider than you expected.
AutoFit and Merged Cells:
AutoFit may not always work as expected with merged cells.
For example, if you’ve merged several cells to create a large heading, Excel may not automatically adjust the size correctly.
If this happens, you may need to adjust the row height or column width manually.
This is one reason why it’s better to avoid merging cells when you don’t really need to.
Common Problems With AutoFit:
AutoFit is very useful, but sometimes the result may not look the way you expected.
The Column Becomes Too Wide:
Suppose one cell contains a very long sentence.
When you AutoFit the column, Excel may make the entire column extremely wide.
In this situation, Wrap Text may be a better option.
AutoFit Doesn’t Work Properly:
If you’re using merged cells, AutoFit may not behave normally.
You may need to adjust the size manually.
The Columns Have Different Widths:
If you AutoFit several columns, Excel adjusts each column according to its own content.
So the columns may end up with different widths.
If you want all columns to have the same width, you should set the width manually instead.
Frequently Asked Questions (FAQ’S):
What is AutoFit in Excel?
AutoFit automatically adjusts the width of a column or the height of a row to fit the content inside it.
How do I AutoFit a column in Excel?
Move your mouse to the border between two column headings and double-click it. Excel will automatically adjust the column width.
How do I AutoFit a row in Excel?
Move your mouse to the border between two row numbers and double-click it. Excel will automatically adjust the row height.
Can I AutoFit multiple columns at once?
Yes. Select multiple columns and double-click the border between any two selected columns. Excel will adjust all the selected columns.
What is the keyboard shortcut for AutoFit Column Width?
You can use Alt → H → O → I to AutoFit Column Width.
What is the keyboard shortcut for AutoFit Row Height?
You can use Alt → H → O → A to AutoFit Row Height.
What is the difference between AutoFit and Wrap Text?
AutoFit changes the width of a column or height of a row to fit the content. Wrap Text keeps the column width and displays the content on multiple lines.
Does AutoFit work with merged cells?
AutoFit may not work correctly with merged cells. In some cases, you may need to adjust the size manually.
AutoFit is a simple Excel feature, but it can save you a lot of time.
Instead of manually adjusting every column or row, you can let Excel adjust the size based on your content.
The next time you see text getting cut off in your worksheet, try AutoFit first.
Just double-click the column or row border, and Excel will usually fix it for you.
Once you get used to AutoFit, you’ll probably stop manually dragging column borders every time your data doesn’t fit.
Related Excel Articles:
If you’re learning Excel, you may also find these articles useful:
- AutoFill in Excel
- Rows and Columns in Excel
- Excel Glossary: 100+ Excel Terms Every Beginner Should Know
- How to Wrap Text in Excel
Discover more from Excellopedia
Subscribe to get the latest posts sent to your email.