Have you ever created an Excel template or an Excel report with a watermark on it or seen any report or invoice with a watermark on it and ever wondered how they do that?
Sometimes you may need to add a watermark with “Confidential” on your excel reports or invoice with “Draft” or “Company Logo” before sharing them with others.
If you’re wondering how they add Watermark in Excel, then no need to think anymore.
In this tutorial, I’ll be sharing how to add, edit and remove watermarks in Excel easily.
Before diving in, let’s check what is the watermark and the uses of adding it to the reports.
What is the Watermark?
A watermark is a logo or text placed on a document or digital asset to protect its identity and ownership. A watermark will be transparent, so viewers can see and read the document like any other.
Without a watermark, a digital asset can be easily theft and leads to unauthorized use.
Often we find watermarks on digital images. A website that sells digital images previews the images with watermarks to their viewers just to make it more difficult to copy or use them.
Nobody wants to use the watermarked image. If anybody wants to add these digital images to their website or blog, they will go and purchase the image from the seller’s website.
We also find the watermarks on hard copies of the documents with company logos.
We can easily add watermarks to Excel worksheets and workbooks like we add watermarks in Microsoft Word.
While Excel is not having a dedicated feature to add a watermark, we can easily add it by using the header and footer sections.
Types of Watermarks:
There are 2 types of watermarks we can add in Excel.
- Text watermark
- Image watermark
In text watermarks we use words and in image watermarks, we use pictures or logos.
Adding a Text Watermark:
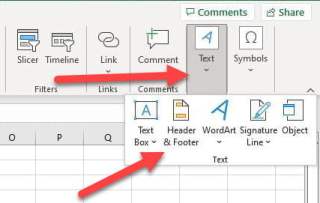
Go to the Insert tab in the ribbon and click on the “Header and Footer” command in the Text group.
Clicking the header and footer will change the view to Page Layout View. We can change it to a normal view once we are done.
Using this header section we are going to add a watermark to the worksheet. We can see 3 boxes in the header section. Click on the middlebox.

Once you clicked on the header section a new tab called Header & footer will appear on the ribbon.
Start typing any word you want as a watermark. Just double-click the word to see the format cells option to change the Font style and size or go to the Home tab and change its font and size.

Now watermark will show at the top of the excel worksheet.
Just to adjust and bring it to the middle of the sheet, select the header box and add the line breaks before the watermark just by clicking enter till it reaches the desired position.

Adding an Image Watermark:
Click on the middlebox in the header section. Once you clicked on the header section a new tab called Header & footer will appear on the ribbon.

Now click the Picture icon under Header & Footer Elements group to open a menu. Select From a File option to browse and add an image from your computer.

Once selected the image, Excel will display it as &[Picture] in the header section. Now click on any cell in the worksheet to see the watermark.

The watermark will display at the top of the excel worksheet.
To change the position of the watermark, place the cursor before the &[Picture] and hit enter to add the line breaks. Add line breaks till it reaches the desired position.
Resize the Image Watermark:
If you want to change the size of the image, click the header box where the image is located. Here we have added a watermark image to the middlebox of the header section. So select that.
Under Header & footer tab on the ribbon, select the Format Picture option from the Header & Footer Elements Group.

Now a format picture dialog box will pop up where you can easily adjust the height and width of the image. Click OK once updated the height and width of the image.
Change the Image Watermark:
If you want to change the image, click the middle box in the header section.
Now click the picture icon under Header & Footer Elements group. A popup box will be displayed.

Click on Replace option to open the insert picture dialog box and select from a file option to browse and add an image from your computer. Now the old image will be replaced with a new image.
Remove the Watermark:
If you want to remove the image, click the middle box in the header section and remove the &[Picture] code. Now watermark will be removed from the worksheet.
Print the Excel Sheet with Watermarks:
You have successfully added the watermark to the Excel worksheet. Save the Excel workbook to use anytime. Now will see how to print the excel sheet with watermarks.
First, we need to change the page view from Page Layout View to Normal View. Changing to normal will not remove the watermark but we cannot see the watermark in normal view. But still, we can change or edit the watermark from the header and footer option.
Go to the View tab on the ribbon and click on the Normal option from the Workbook View Group. This will change the worksheet view to Normal.

Now go to the File menu and click Print or simply use Ctrl + P Excel Keyboard Shortcut to open the print preview.
There you can see how a printed worksheet will look. Change the print settings if any are required and take the printout of the worksheet.

Things to remember:
- You cannot add more than 1 watermark to 1 header box. This means you can add 3 watermarks in the header.
- A combination of word and image watermarks can be added to a header box.
Discover more from Excellopedia
Subscribe to get the latest posts sent to your email.